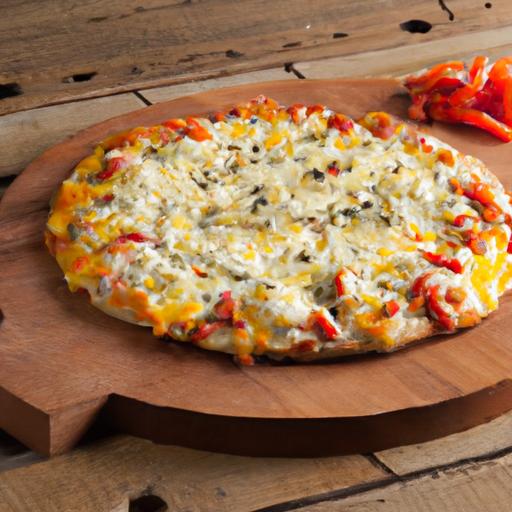

There’s nothing quite like the satisfying crunch of a perfectly baked pizza crust-the golden edges, the delicate crispness that gives way to a tender, chewy center. But for those navigating the gluten-free world, achieving that ideal balance can feel like a culinary quest of epic proportions. Welcome to perfectly crispy: Yoru Ultimate Gluten-Free Pizza Crust guide, where science meets artistry and flour blends transform into irresistible, crispy canvases for your favourite toppings. Whether you’re a seasoned gluten-free gourmand or just starting your journey, this guide will unlock the secrets to crafting pizza crusts that don’t just taste great-they deliver that coveted crunch with every bite. Get ready to turn your kitchen into a gluten-free pizzeria paradise!
Choosing the Ideal Gluten-Free Flours for a Crunchy crust
Perfectly crispy pizza crust starts with selecting the right gluten-free flours, which provide both structure and that coveted crunch.Unlike traditional wheat flour, gluten-free blends require a thoughtful balance of flours with varying textures and flavors. Brown rice flour offers a mild nuttiness and a sturdy crumb, while tapioca starch imparts chewiness and elasticity. Adding almond flour not only enhances crispness but also contributes a subtle richness that deepens every bite.For the ultimate crunchy crust, a blend of about 40% brown rice flour, 30% tapioca starch, and 30% almond flour is your secret weapon.
Mastering the Art of Hydration and Dough Consistency
Achieving perfectly crispy gluten-free pizza dough hinges on mastering hydration. The moisture content governs not only texture but also how the crust behaves during baking. Aim for a slightly sticky dough that holds together without being wet.Start by mixing your dry gluten-free flour blend with warm water and a tablespoon of olive oil for elasticity and flavor. Don’t rush-allow the dough to hydrate for 5-10 minutes before kneading gently with wet hands, preventing excessive stickiness. This resting step ensures the starches fully absorb the liquid, resulting in a dough that bakes evenly and crisply.
Techniques to Achieve an Evenly Baked and Crispy Base
Preheating your oven and baking surface is a game-changer. A pizza stone or steel heated at the highest oven temperature (450-500°F) mimics traditional brick ovens by delivering intense direct heat. Roll or press your dough thinly onto parchment paper-handling it gently ensures it stays intact. Dock the surface lightly with a fork to avoid bubbling,then slide it onto the hot stone for 8-12 minutes. Watch for a golden edge and bubbly top before adding toppings. For an extra crunch, finish with a rapid 2-minute broil, but keep a close eye to prevent burning.
Pro Tips for Flavorful Toppings That Complement Your Crust
Light toppings are key to preserving the crust’s crispiness. Opt for fresh, vibrant ingredients like heirloom tomatoes, basil, and mozzarella pearls, which melt beautifully without sogginess. A drizzle of extra-virgin olive oil before and after baking infuses richness and helps seal moisture away from the base. Consider sprinkling grated Parmesan or a pinch of smoked paprika on the crust’s edges for added aromatic depth. For an indulgent twist, add caramelized onions or roasted garlic, but keep these toppings in moderation to maintain that crunchy, perfect texture.
Prep and Cook Time
- Prep Time: 20 minutes (including dough hydration)
- Cook Time: 10-15 minutes
Yield
Serves 2 medium pizzas (8-10 inches each)
Difficulty Level
Medium
Ingredients
- 1 cup brown rice flour, sifted
- 3/4 cup tapioca starch
- 3/4 cup almond flour, finely ground
- 1 tsp xanthan gum (for binding)
- 1 tsp baking powder
- 3/4 cup warm water (110°F/45°C)
- 2 tbsp olive oil (plus extra for drizzling)
- 1 tsp honey or maple syrup (optional, for yeast activation)
- 1/2 tsp salt
- Optional: 1 tsp dried Italian herbs (oregano, basil mix)
Instructions
- Preheat your oven to 475°F (245°C) and place a pizza stone or steel inside to heat for at least 30 minutes.
- Mix the dry ingredients-brown rice flour, tapioca starch, almond flour, xanthan gum, baking powder, salt, and herbs-in a large bowl until evenly combined.
- whisk warm water, olive oil, and honey together in a separate bowl. Gradually add this mixture to the dry ingredients, stirring to form a sticky dough.
- Let the dough rest for about 10 minutes to hydrate and thicken.
- Lightly flour a clean surface with brown rice flour and transfer the dough onto it. Using wet hands, gently knead 3-4 times to combine fully, handling it carefully to maintain softness but manage stickiness.
- Roll out the dough between two sheets of parchment paper to about 1/8 inch thickness.Pierce the surface lightly with a fork to reduce air pockets.
- Slide the parchment with dough onto the preheated stone and bake for 8-10 minutes until edges turn golden and the base is firm.
- Remove from oven,add toppings of choice,and return for another 5-7 minutes until cheese is melted and toppings heated through.
- Optional: Broil for 1-2 minutes for extra browning, watching closely to avoid burning.
Chef’s Notes
- For a chewier crust, substitute almond flour with sorghum flour at a 1:1 ratio.
- If dough is too sticky,dust with a little more brown rice flour when rolling out,but avoid over-flouring to keep crispness.
- This dough freezes beautifully-shape balls ahead, wrap tightly, and freeze for up to 2 months.
- Learn more about gluten-free flour blends for additional options and tips.
Serving Suggestions
Slice your cracker-thin, perfectly crispy gluten-free pizza and serve hot with a sprinkle of fresh basil and chili flakes.Pair with a light arugula salad tossed in lemon vinaigrette, or a chilled glass of your favorite white wine. For an added pop of color and flavor, garnish with microgreens or shaved Parmesan. These toppings not only elevate the dish but beautifully contrast the golden, crunchy crust beneath.
| Nutrient | Per Serving |
|---|---|
| Calories | 320 kcal |
| Protein | 8 g |
| carbohydrates | 37 g |
| Fat | 14 g |

Q&A
Q&A: Perfectly Crispy – Your Ultimate Gluten-Free Pizza Crust Guide
Q1: Why is it so challenging to get a gluten-free pizza crust crispy?
A: Gluten is the magic protein that gives traditional pizza dough its stretch, chew, and crispiness. Without it, crusts tend to be crumbly or soggy. The challenge lies in replicating that structure and texture using gluten-free flours, which don’t naturally bind or crisp the same way. but with the right blend of flours, moisture control, and baking techniques, you can achieve that coveted crunch.Q2: Which gluten-free flours work best for a crispy pizza crust?
A: The secret lies in combining flours to balance flavor, texture, and crispness. Rice flour offers a light and crisp base,tapioca or potato starch adds chew and elasticity,and almond or oat flour gives a bit of nuttiness and structure. Experimenting with these in the right ratios helps mimic the properties of gluten.
Q3: How vital is adding a binder like xanthan gum or psyllium husk?
A: Super important! Without gluten, your dough can fall apart easily. Xanthan gum and psyllium husk act as glue, holding the dough together and trapping air bubbles that lead to a light, crispy crust. Psyllium husk also helps retain moisture while keeping the crust firm-perfect for that crunch.
Q4: Can I use a pizza stone or baking steel to get a crispier crust?
A: Absolutely! Preheating a pizza stone or steel mimics a traditional pizza oven by providing intense, even heat from below. This rapid heat transfer crisps the bottom crust quickly, preventing sogginess and creating that professional pizzeria snap.
Q5: Should I par-bake the gluten-free crust before adding toppings?
A: Yes! Par-baking-or pre-baking-the crust for about 5-7 minutes partially cooks the dough and firms it up, reducing moisture absorption from sauce and toppings. This step ensures every bite stays irresistibly crispy instead of limp.
Q6: How do hydration levels affect my gluten-free pizza crust?
A: Hydration-the ratio of water to flour-is a balancing act. Too little water and the dough becomes dry and crumbly; too much and it turns sticky and hard to handle. Gluten-free dough often requires a bit more hydration than traditional dough because the flours absorb moisture differently.Getting it just right sets you up for a crispy, yet tender crust.
Q7: Can I make my gluten-free pizza crust ahead of time?
A: You bet! You can prepare the dough or even bake the crust in advance and store it. For dough, refrigerate for up to 24 hours to let flavors develop. For a baked crust,cool fully,then wrap tightly and reheat in a hot oven before topping. This convenience doesn’t sacrifice crispness.
Q8: What are some tips to add extra flavor without compromising crispiness?
A: Infuse your dough with herbs,garlic powder,or nutritional yeast for subtle flavor boosts. Brushing the crust lightly with olive oil before baking not only adds richness but aids in browning and crisp texture. Just avoid heavy, wet toppings that weigh down the crust.
With these insider secrets, your gluten-free pizza crust can finally match-and maybe even out-crisp-the classic pies. Ready to roll, bake, and crunch your way to pizza perfection? The ultimate gluten-free crispy crust adventure awaits!
Key Takeaways
There you have it-a crispy, golden ticket to gluten-free pizza bliss. Whether you’re a seasoned gluten-free pro or just starting your crust crusade, mastering these tips promises a slice that’s crisp on the outside, tender inside, and utterly satisfying with every bite. Remember, the perfect gluten-free pizza crust is as much about understanding your ingredients as it is about a little patience and passion. So, roll up your sleeves, preheat that oven, and get ready to create pies that don’t just meet expectations-they redefine them. Your ultimate gluten-free pizza adventure starts now!